How You Can Use Custom Keywords via Katalon To Improve Test Automation Most applications nowadays are made up of several repeated steps in their navigation. These repeated steps may cause some toil in Automation testing as we are required to write or record the steps all over again. Another case would be automating the required […]
Scriptless Test Automation with TestProject

Karinka Priskila
September 7, 2022
13 Mins Read

What is Scriptless Test Automation and how can we use TestProject to do this?
In the previous blog https://icehousecorp.com/automation-testing-and-how-to-start/, we discussed how test automation could significantly benefit the testing process. This time, I will explain one of the test automation methods, a scriptless test automation which will be helpful for software tester who does not have programming & scripting skill background. For a manual tester, traditional test automation can be a big challenge since it requires scripting & basic programming skills. A scriptless test automation framework can be an option to explore.
Scriptless test automation is a method to automate tests using tools instead of writing test scripts from scratch. The term scriptless refers to an approach to automate the functional test cases without or with a minimum amount of code (some code might be required to handle the critical actions). There are some tools that the tester could use to do automation testing without or with minimum programming skills. This tool allows us to learn the process of automation testing without worrying about programming. A scriptless testing tool can record our actions on the application screens as we navigate through features. The tool will generate the same for the test steps that we would generally write a test script by recording these actions.
Some advantages of scriptless automation testing over script-based testing are:
| Script-based Testing | Scriptless Testing |
| The tester needs have an automation expertise | The tester primarily needs application and business knowledge |
| Test cases can’t be easily reused in different scenarios | Has more flexibility for reusing test cases in different scenarios |
| Dashboards, reporting, test scheduling may not be readily available | Dashboards, reporting, test scheduling are generally available |
| Have to build custom third-party integrations | Usually has out-of-the-box third-party integrations |
| Requires time and effort in setting up the testing infrastructure | Require little effort in setting up and getting started |
Scriptless Automation Testing Tools
Let’s quickly learn some of the scriptless automation testing tools that lead the market based on Software Testing Help:
| Tools | Description |
| – ACCELQ is the only cloud-based continuous testing platform that seamlessly automates API and web testing without writing a single line of code. – IT teams of all sizes use ACCELQ to accelerate their testing by automating critical lifecycle aspects like test design, planning, generation, and execution. ACCELQ customers typically save over 70% of the cost involved in the change & maintenance efforts in testing, addressing one of the major pain points in the industry. – ACCELQ makes this possible with an AI-powered core to bring self-healing automation amongst other unique capabilities. Design and User experience focus is at the heart of ACCELQ’s continuous innovation approach with a relentless effort to accelerate testing and improve delivered Quality for its customers. | |
| – Kobiton scriptless test automation is the fastest way for mobile test automation. – This intelligent test automation platform has functionalities for creating and executing scriptless automation on any device. – Perform the manual test on one device, and Kobiton’s AI testing framework can automatically execute the same test over other real devices and in the background. – 100% Appium code can be generated with this platform. Kobiton provides the solution for the flaky test scripts through Appium Anywhere. | |
 | – Selenium IDE is an open-source tool for Test Automation. – It works through record and playback. It is used as a plugin for Chrome or Firefox browsers. It supports cross-browser execution using Command-line Runner for Selenium IDE. – It has the capability to record multiple locators for each element that it interacts with. – Test cases you create in Selenium IDE will be reusable. |
 | – TestProject is a free end-to-end test automation platform for web, mobile, and API testing. This is an open-source-friendly tool built on top of Selenium and Appium, which enables the QA to test Web applications along with Android and iOS effortlessly. TestProject mainly comprises two different components: the Test Recorder and the TestProject SDK. – Test Recorder allows the user to directly record the tests from the UI (without writing code). – TestProject SDK allows programmatic development of test cases. |
In this blog, I will only explain the TestProject tool. I will share step-by-step instructions on how to do the scriptless automation testing using the Test Recorder of this tool.
TestProject
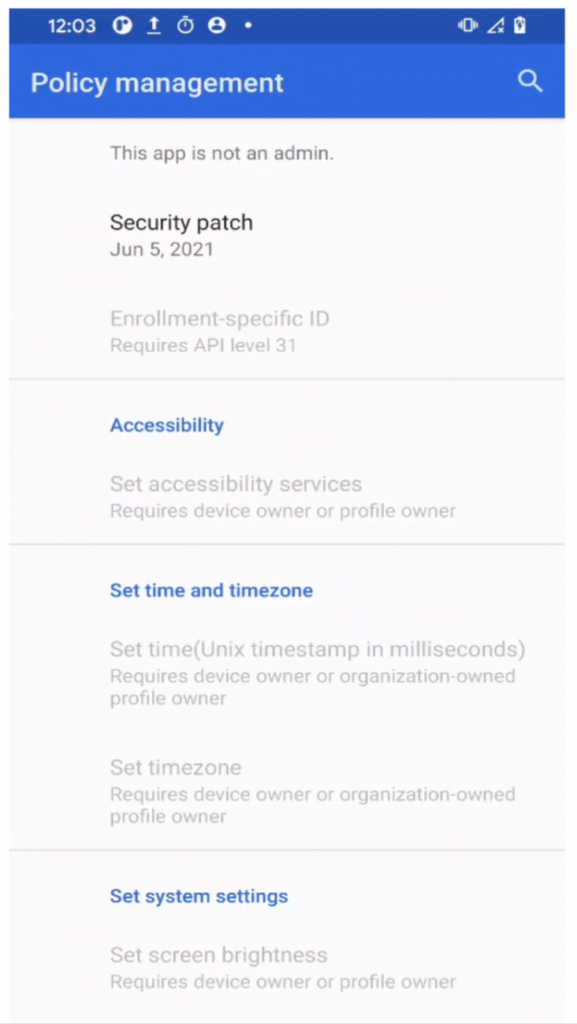
Let’s get started by automating one simple flow in a mobile application. In this blog, I will use the Test DPC application, a sample mobile application to view Policy management. In this app, we can perform a general search by tapping on the search icon at the top-right corner.
I will create the automation testing for search functionality on this application on the TestProject tool. Let’s look at the step-by-step instructions to create the automation testing with TestProject on the following flowchart:

Install TestProject
The first thing that we need to do is to install the TestProject on our machine. In this blog, I will explain how to install the TestProject on a MacOS machine.
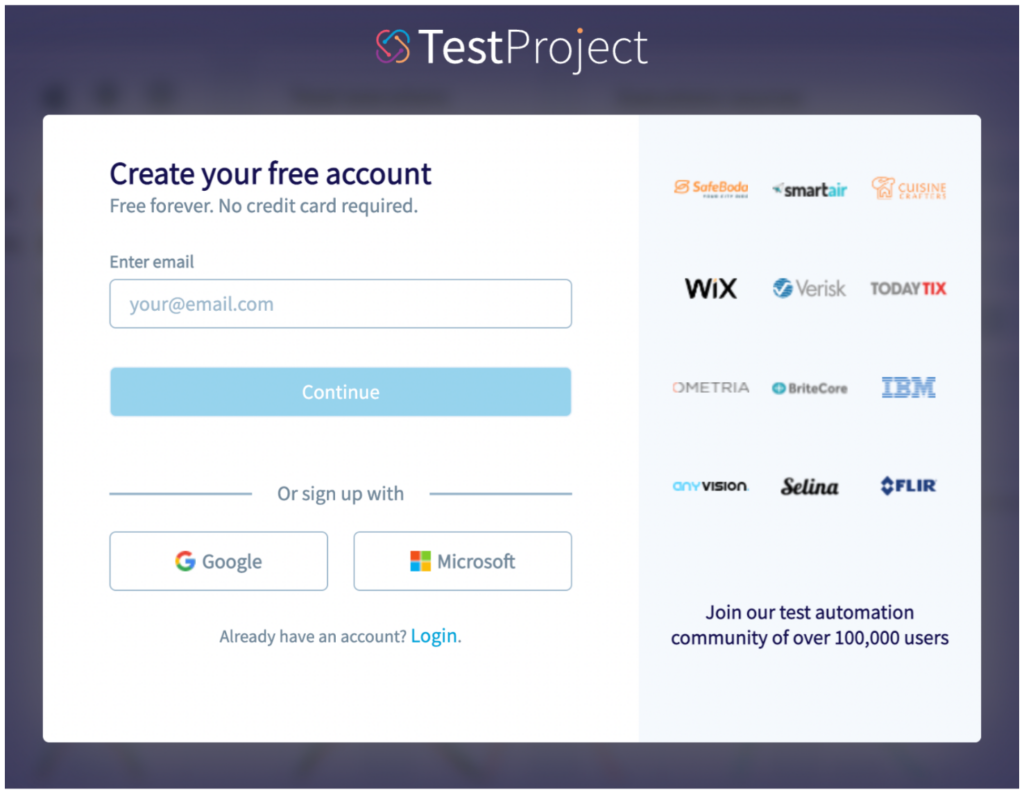
- Go to https://testproject.io/ and click on the Free Sign Up button in the main navigation

- Create your free account with email, Google, or Microsoft
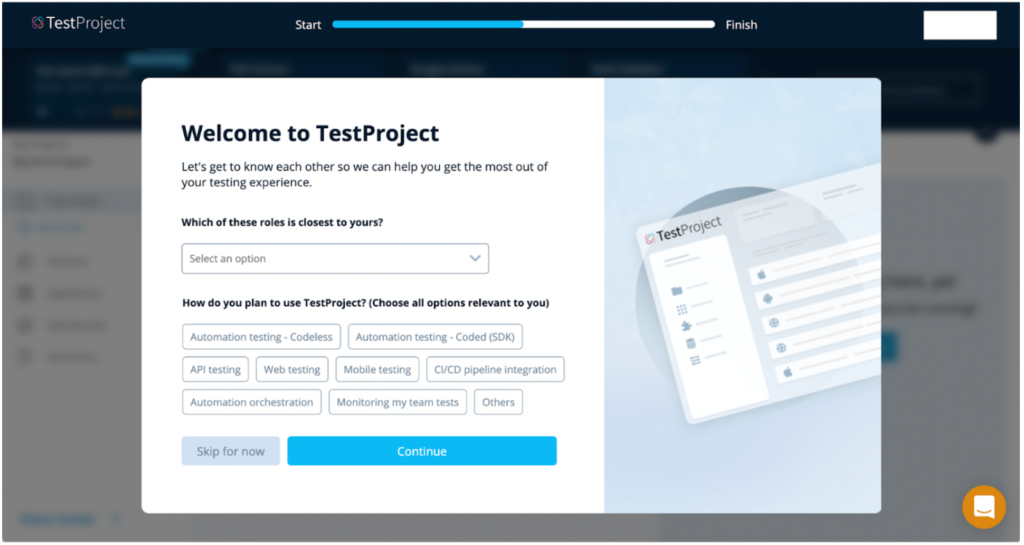
- Once your account is created, this screen will show. You can choose your Roles and How you plan on using TestProject. After selecting them, you can click Continue to the next step. If you do not want to fill these questions, you can click on the Skip for now button.
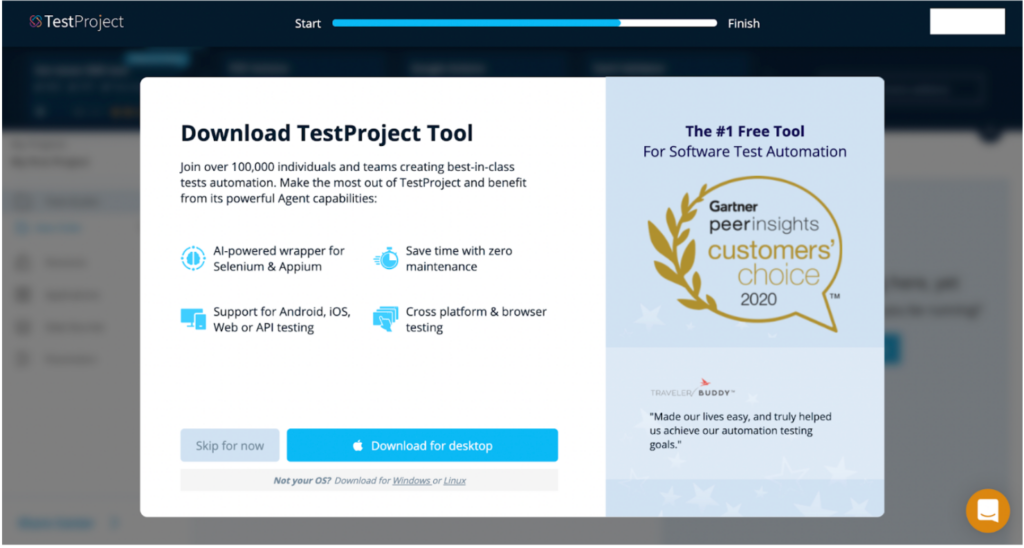
Clicking on the Continue and Skip for now button will redirect you to the Download TestProject Tool screen.
- We can Download the TestProject Tool which is the TestAgent on this screen. The TestAgent allows tests to run on any computer on which its installation happens. Additionally, it communicates with the TestProject platform and executes the tests on the local machine. Click the Download for desktop button. I recommend not skipping this step and installing the agents right away.
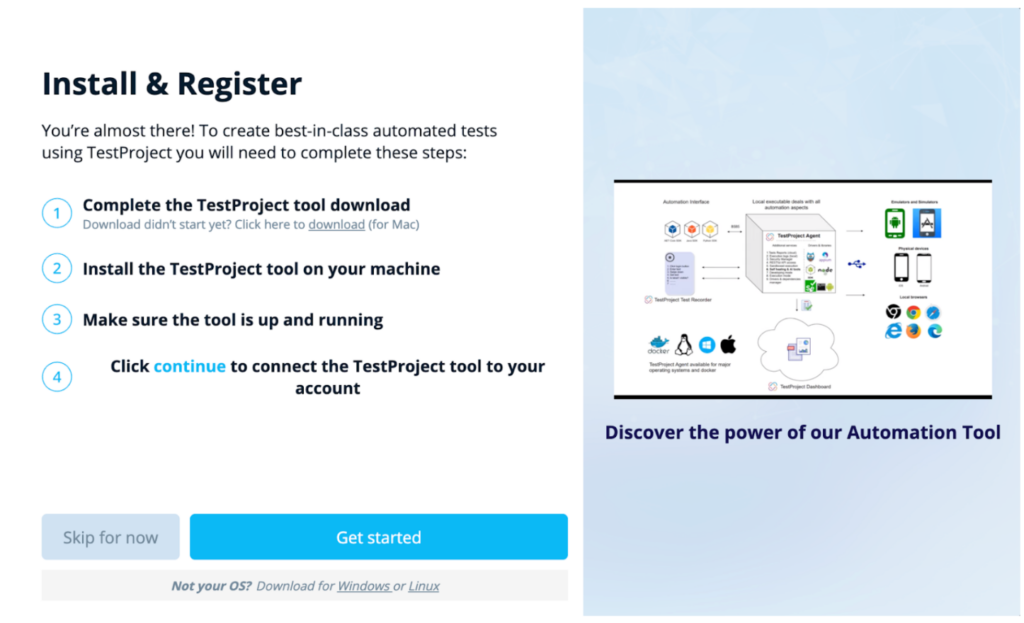
- Follow the steps to install and register the agent until the agent registration completed
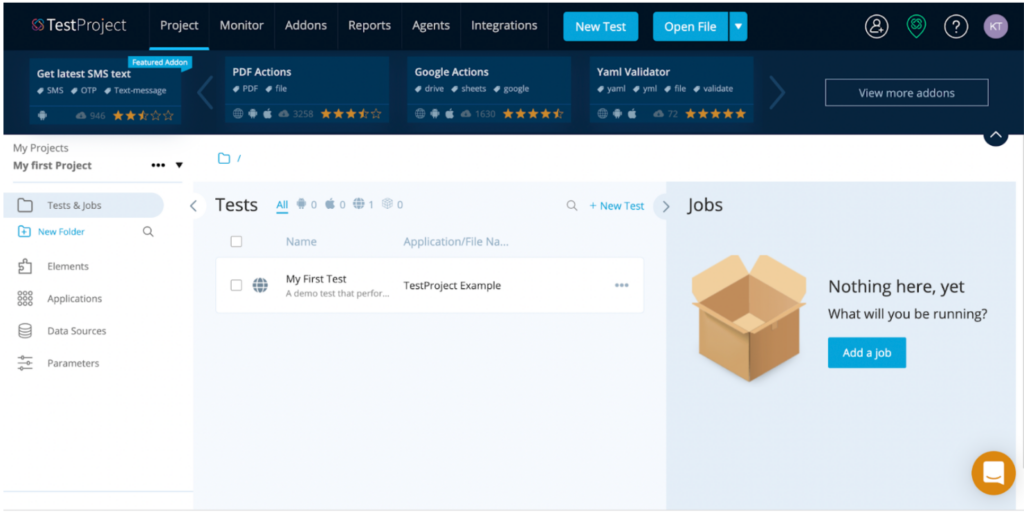
- Congratulations, you have done the installation process and welcome to the default dashboard of TestProject!
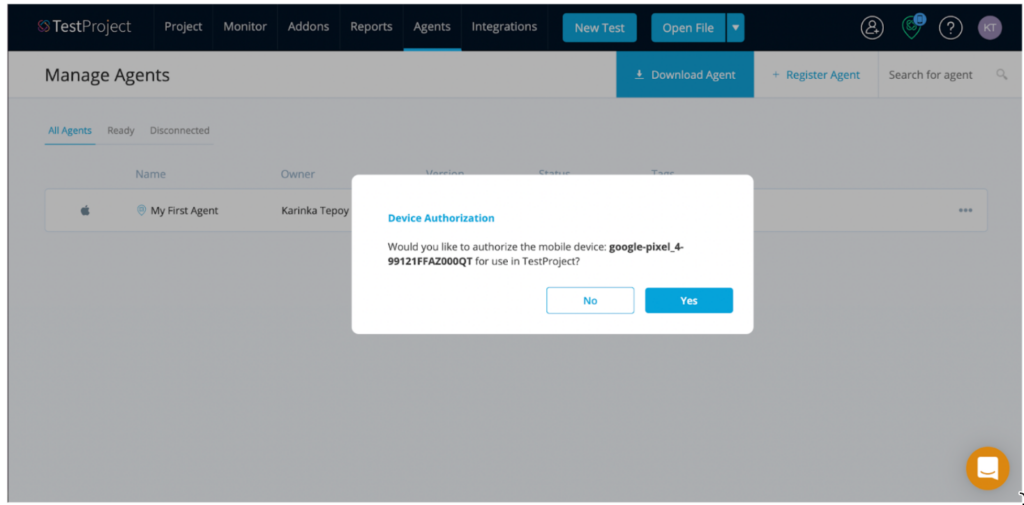
- In this example, I am going to use Google Pixel 4 as the agent. Connect the testing device with your computer using a cable. In this case, I am going to connect Google Pixel 4 to my computer. After the agent is connected, please authorize that agent. Click the Yes button on this dialogue.
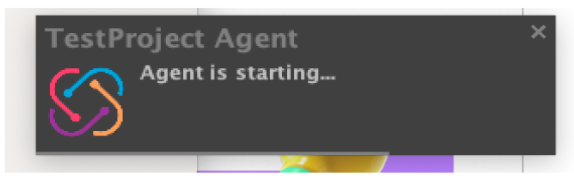
- Make sure the TestProject Agent is up and running
Also, the agent (in this case Google Pixel 4) is connected by hovering on this button. Ensure the Google Pixel 4 is listed in the Connected Device section.

If somehow your device is not showing on the Connected Device section, you might need to enable the developer options of your phone first. For more detailed steps on how to enable the developer options on your phone, please read this article.
Create the Project
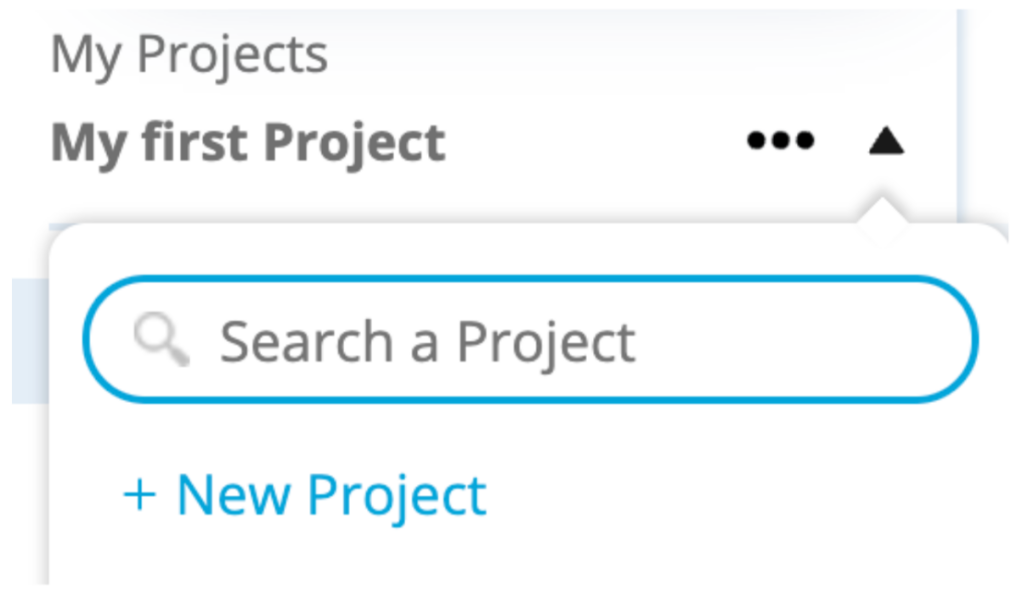
In TestProject, a Project is usually the name of the application that we are going to test. In this blog, the Project will be “Test DPC project”. After the installation is completed and the agent is connected, now we are ready to create a Project.
- Click the Project menu on the main navigation

- Click the arrow on the My Projects section and click the + New Project button
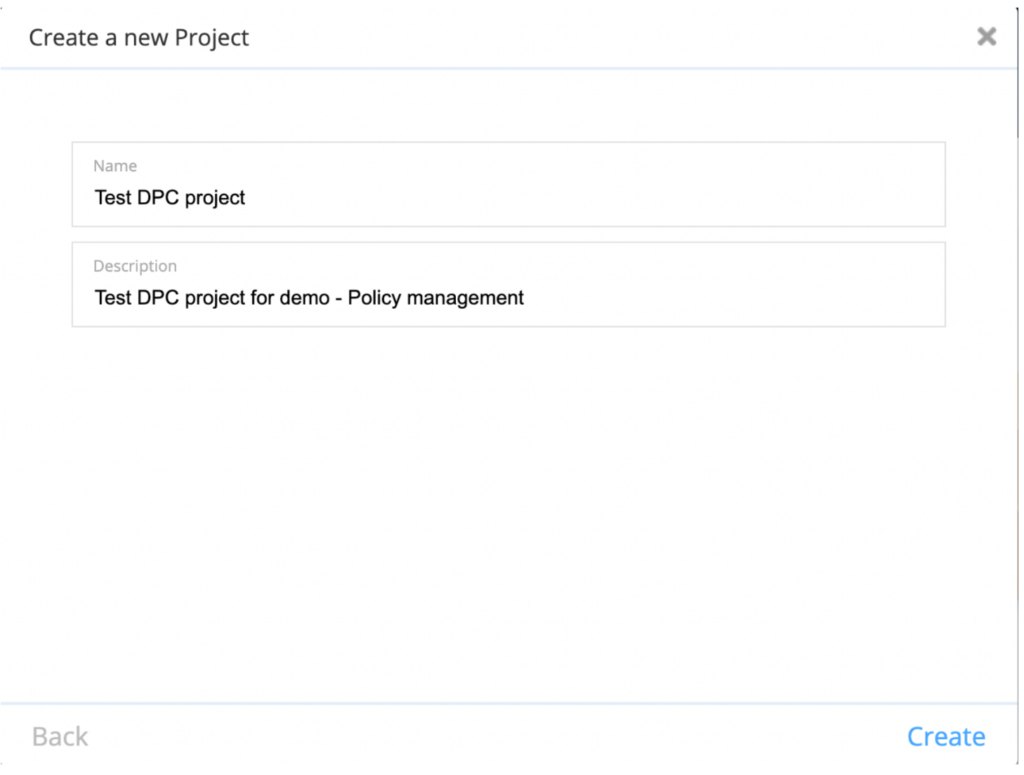
- Enter the Name and Description of the project then click Create button
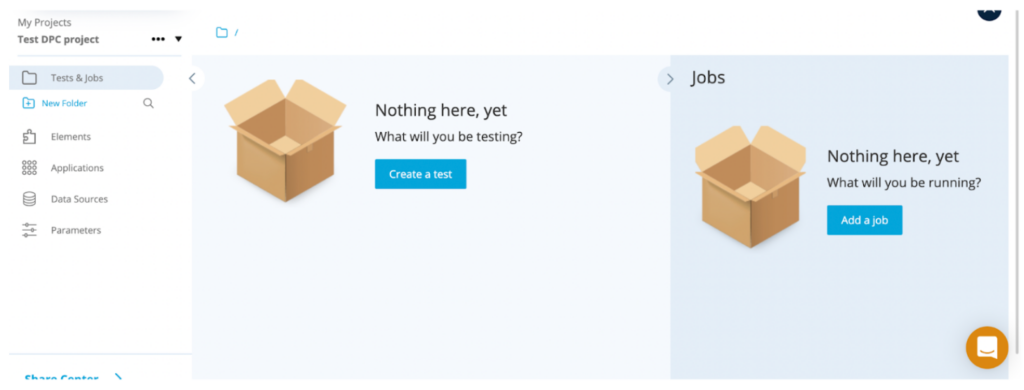
- Congratulations, your new project has been created!
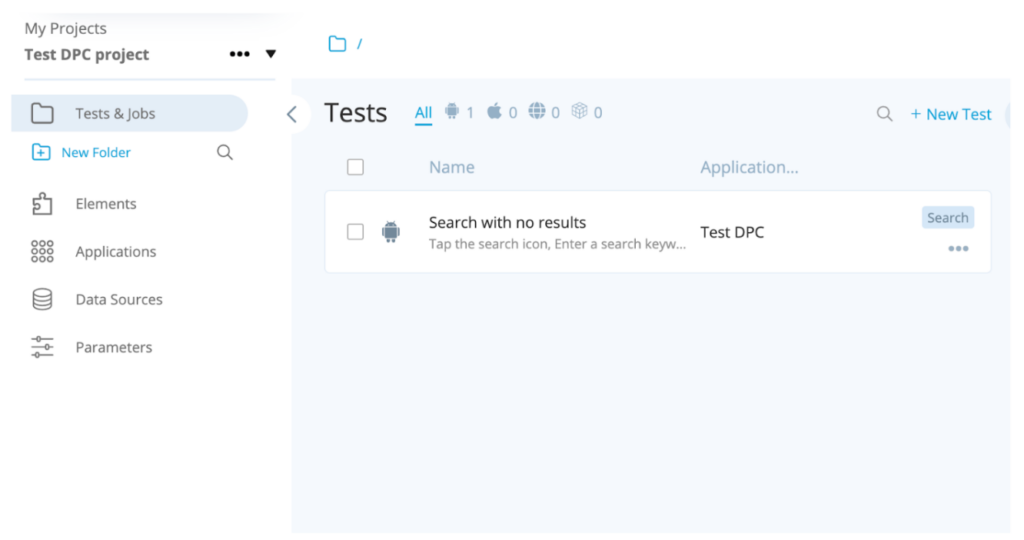
Create Test
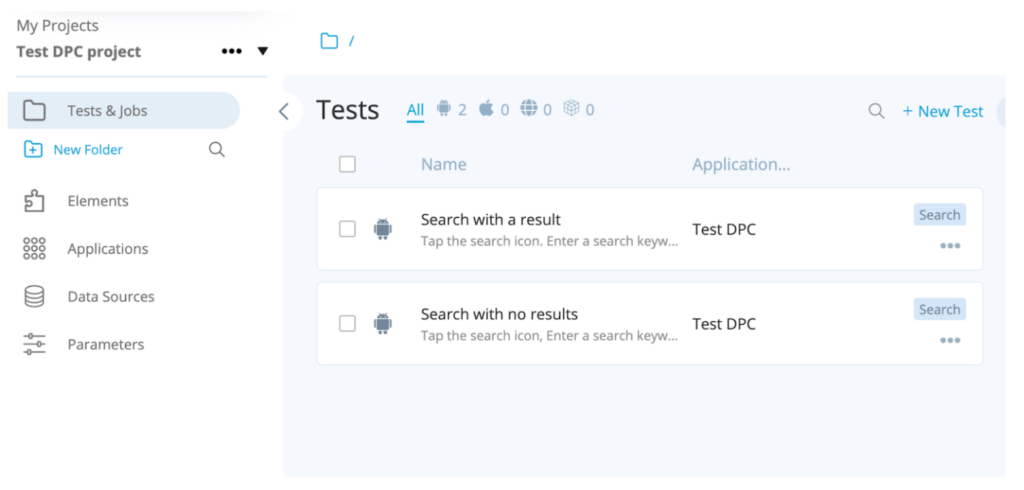
In TestProject, ‘Tests’ is the automated test case. In this blog, I will create two Tests that will cover the steps to test the Search functionality of the Test DPC application. I will create one negative test and one positive test with the scriptless method:
- Test Case 1 (negative): Search with no results
- Test Case 2 (positive): Search with a result
Please follow these steps:
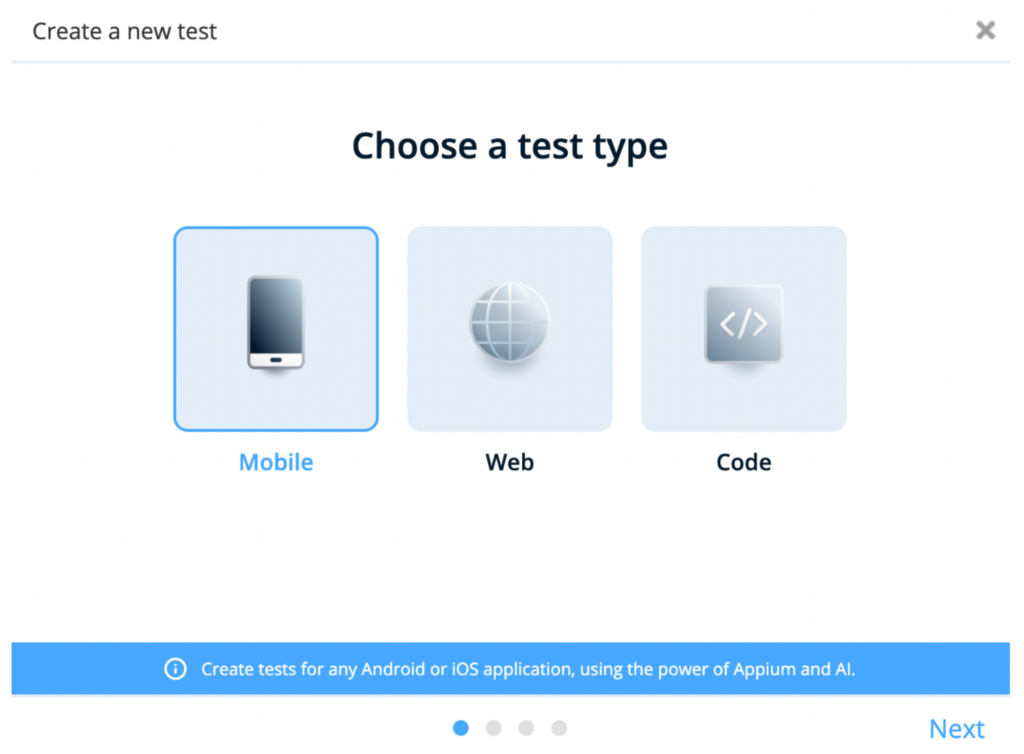
- Click the Create a test button and choose a test type. In this case, we will choose Mobile because we are going to create a test for a mobile application. Click Next to continue to the next steps.
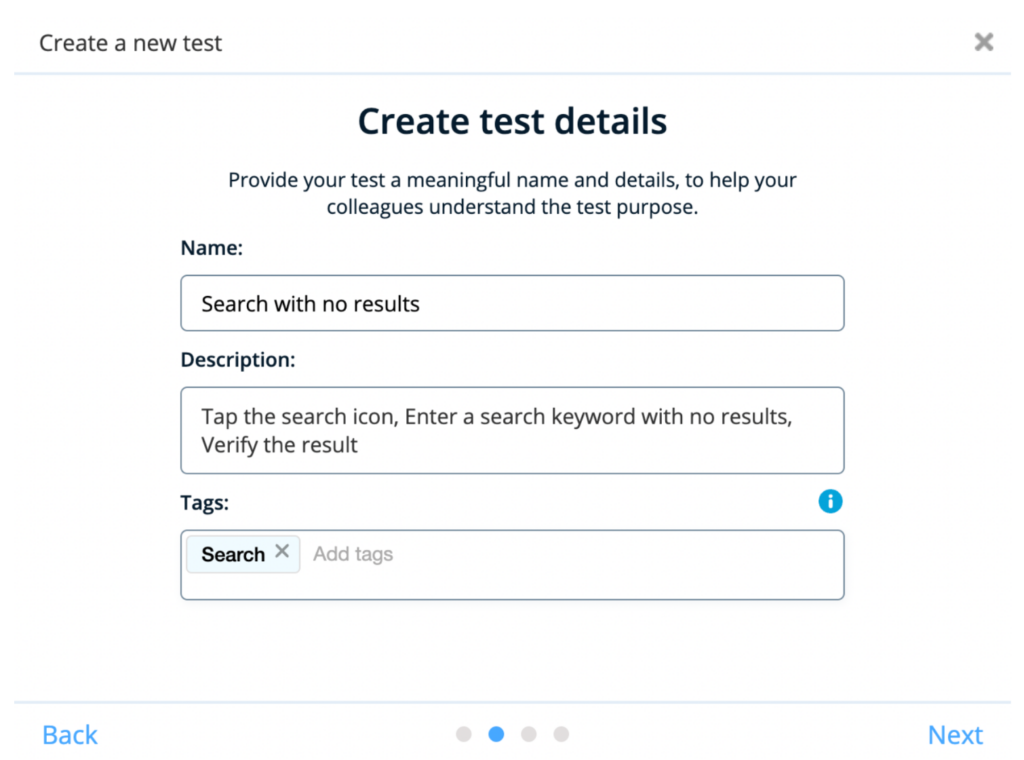
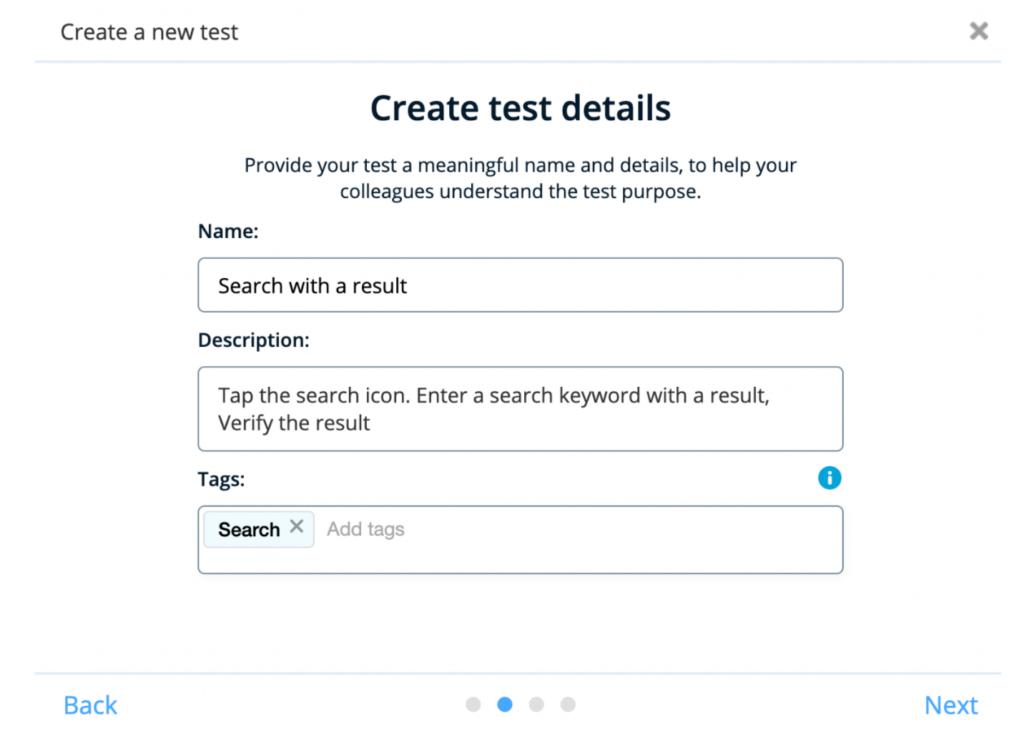
- Enter the Name, Description, and Tags (if needed) of the test and click the Next button. In the Description, I usually put what steps are inside this Test. That way, next time when I revisit this project I know what steps are inside this Test without opening it.
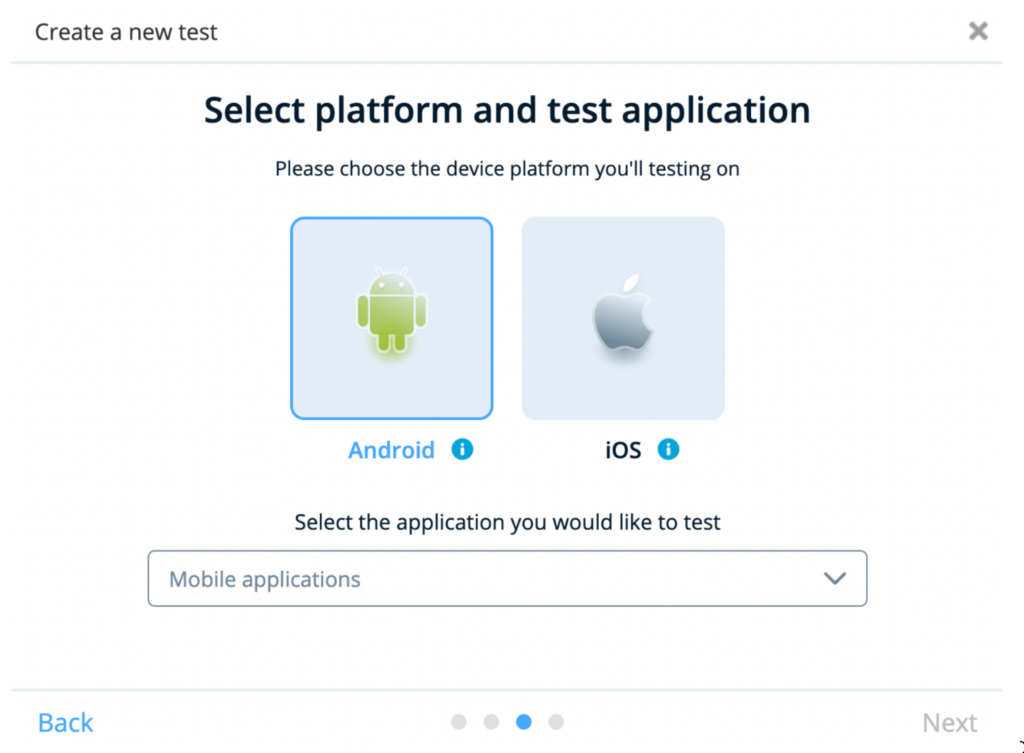
- The next step is to choose the platform and application to test. In this step, I will choose Android as the platform because I want the Test to be tested in Android (Google Pixel 4).
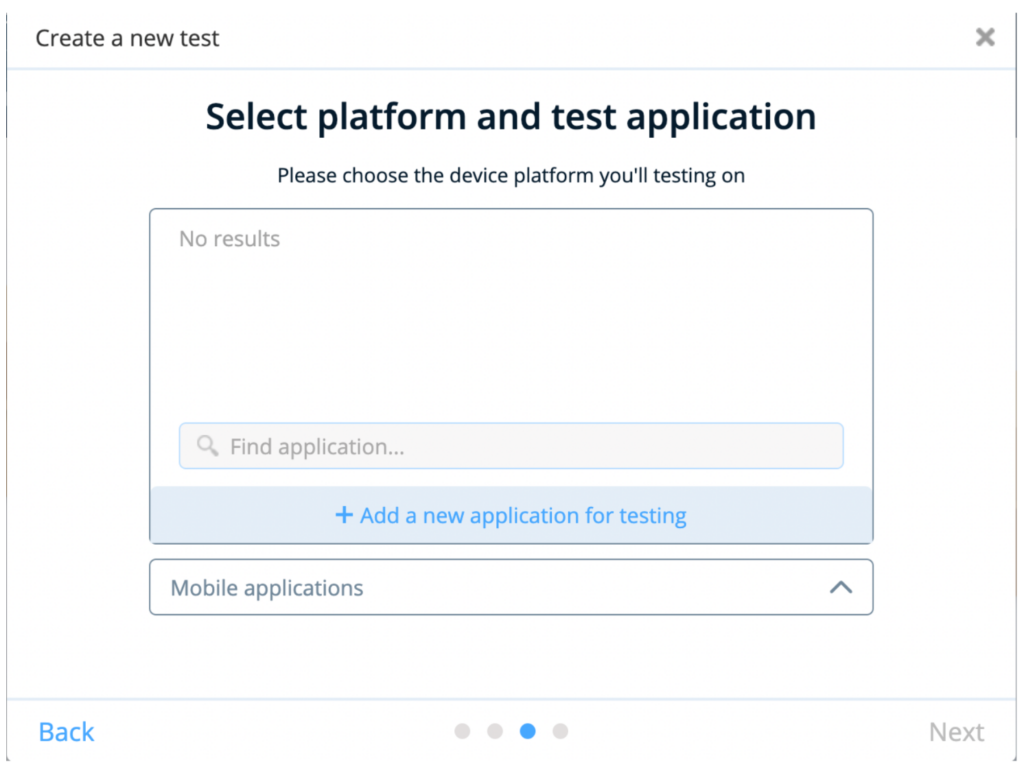
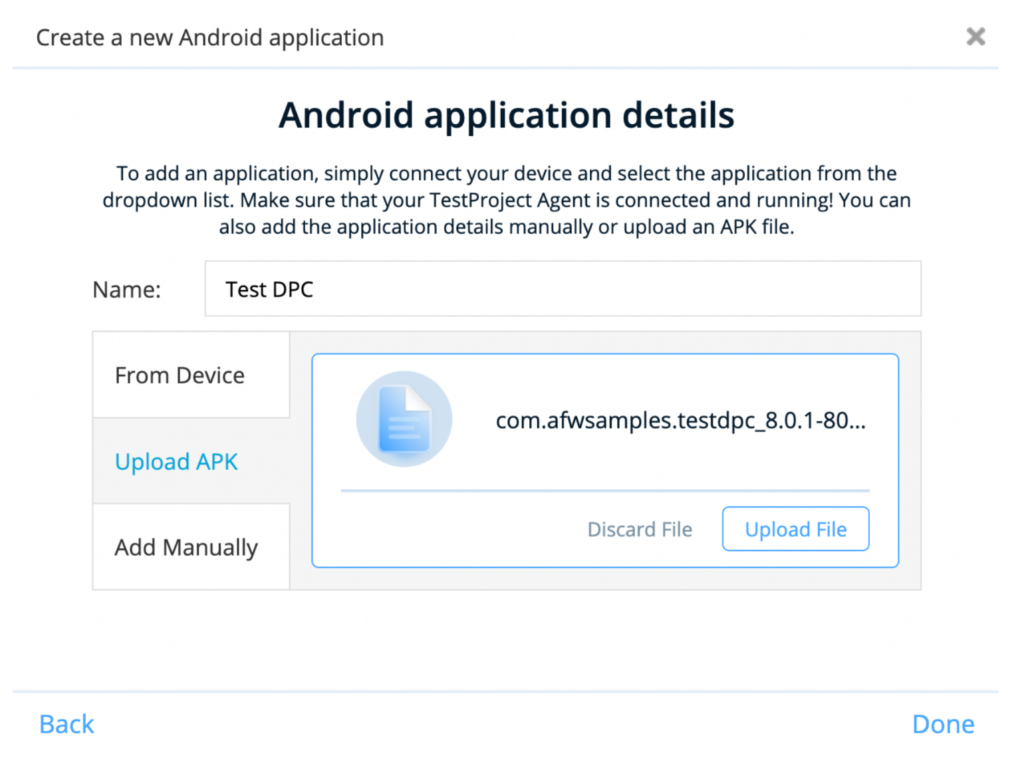
- On the same screen, let’s upload the application that we are going to test. Click the Mobile Applications and click the + Add a new application for the testing button.
- Since the application will be tested on Android, so we need the apk file of the application. In this example, I will use the Upload APK method to upload the file to TestProject. So, enter the application Name and select Upload APK. Click Upload File and click the Done button.
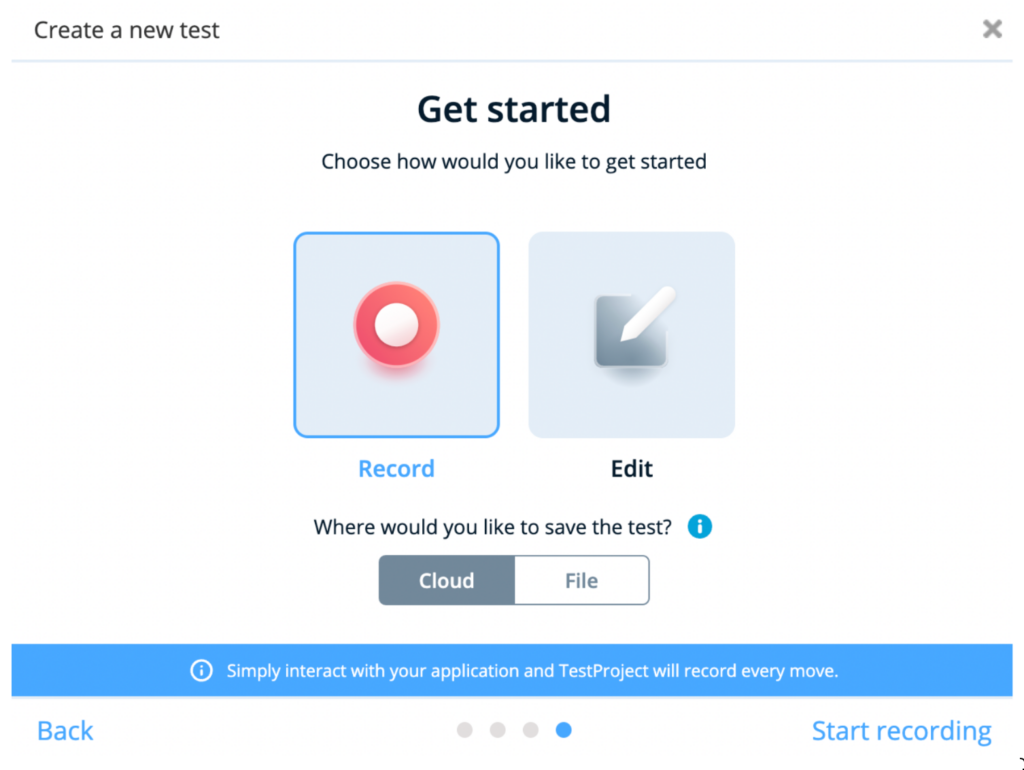
- This is where the magic happens! Please select Record and Start Recording. With this method, TestProject will record every activity we do on the application and automatically create the test script for us. Amazing!
- The Recording mode will show like this and we are ready to interact with the app.

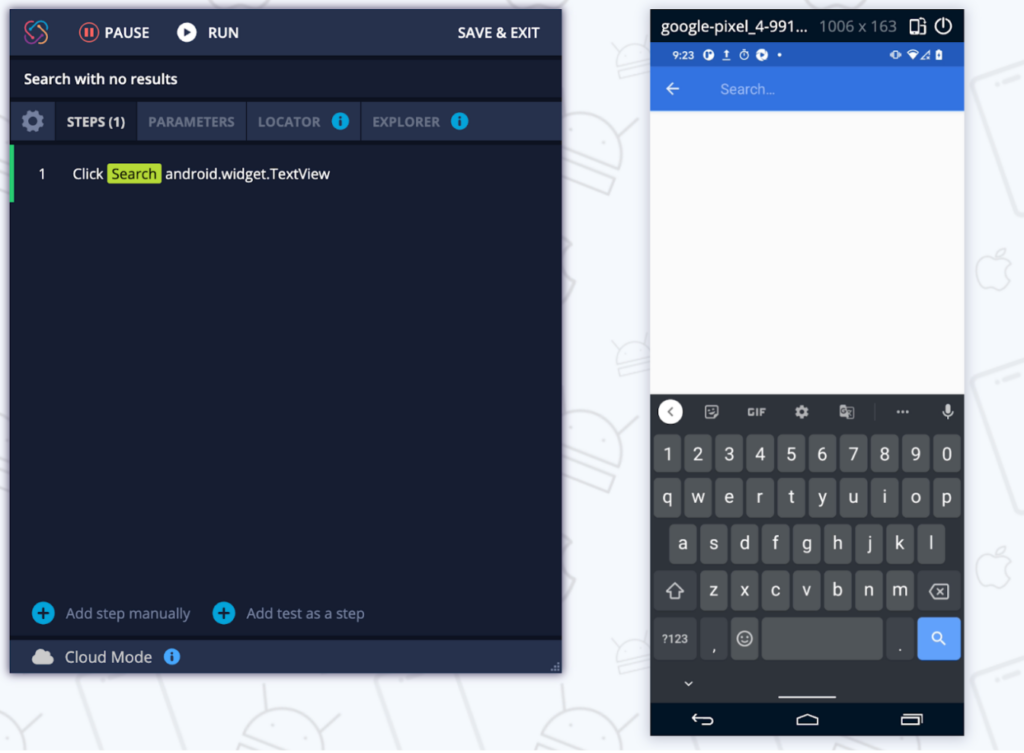
- TestProject will record every activity we do on the app and automatically create the steps for us. In this example, we will do these activities:
- Tap the Search button
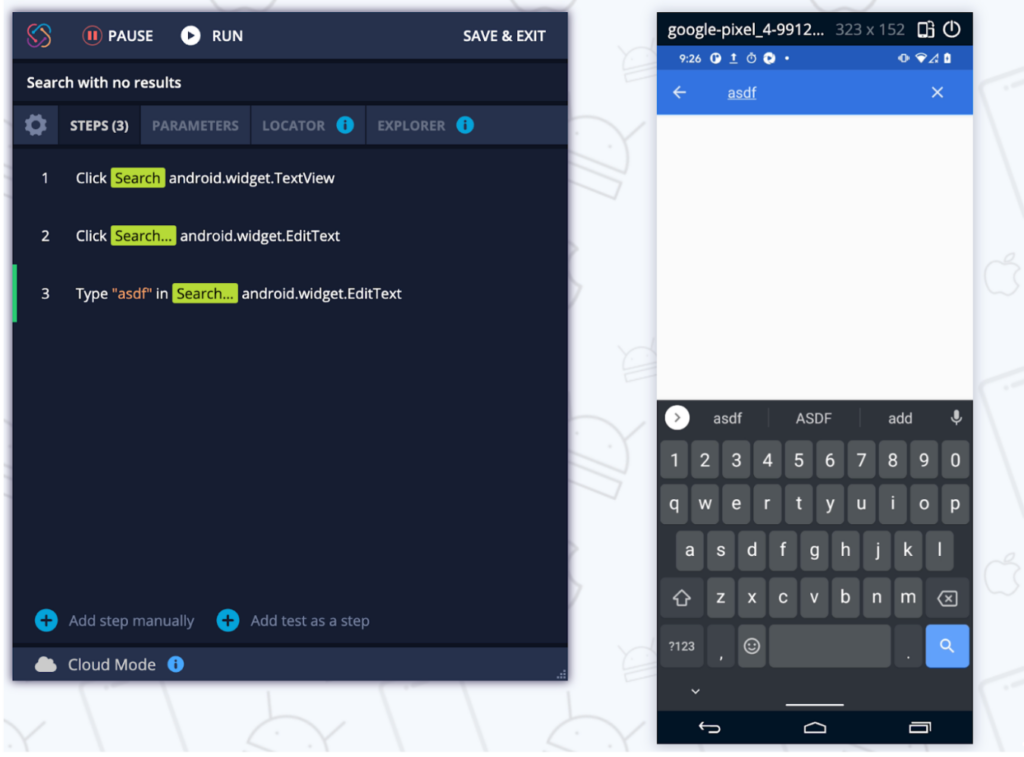
- Tap the Search button
- Tap the Search bar and enter the search keyword “asdf” (see 2 steps are added because we did 2 activities: Click the Search bar and Type the search keyword.
- Verify that the screen has no results or is empty. Press shift twice -> select Validation -> Contain Text?. In this way, we can verify whether the screen is empty or not if the search has no results.

- After that, click Save & Exit button on the left screen, and congratulations our first Test has been created and shown on our dashboard!
- Let’s create the next Test with these details:
- Name: Search with a result
- Description: Tap the search icon. Enter a search keyword with a result,
Verify the result - Tags: Search
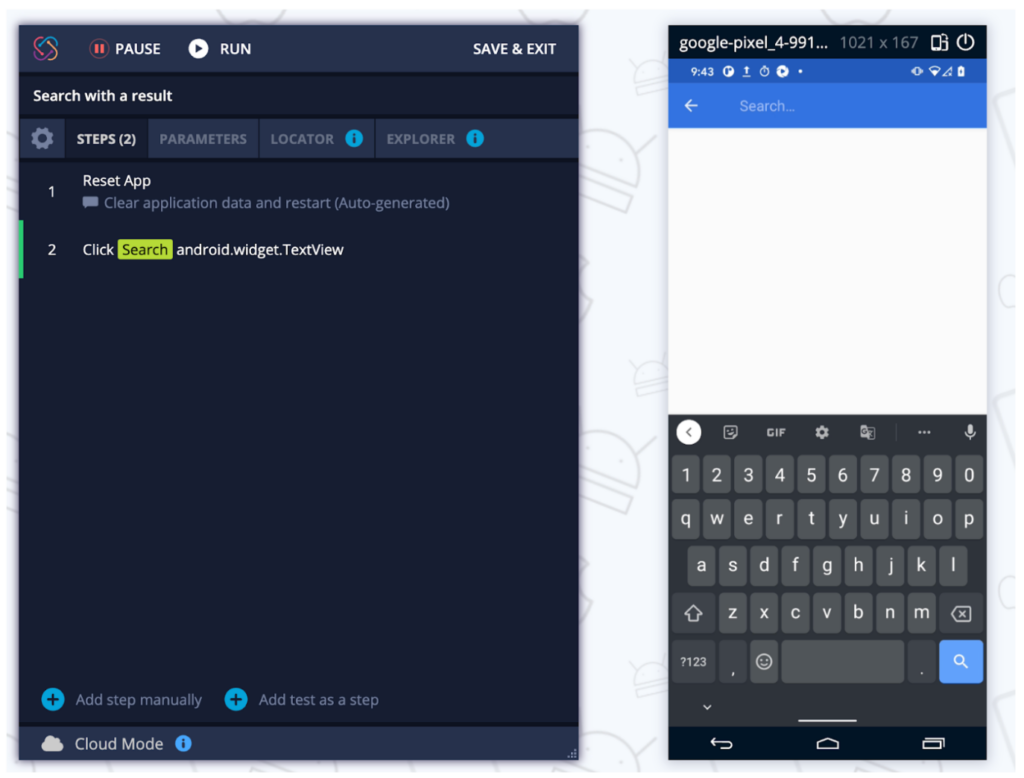
- TestProject will record every activity we do on the app and automatically create the steps for us. In this example, we will do these activities:
- Tap the Search button
- Tap the Search button
- Tap the Search bar and enter the search keyword “test” (see 2 steps are added because we did 2 activities: Click the Search bar and Type the search keyword.
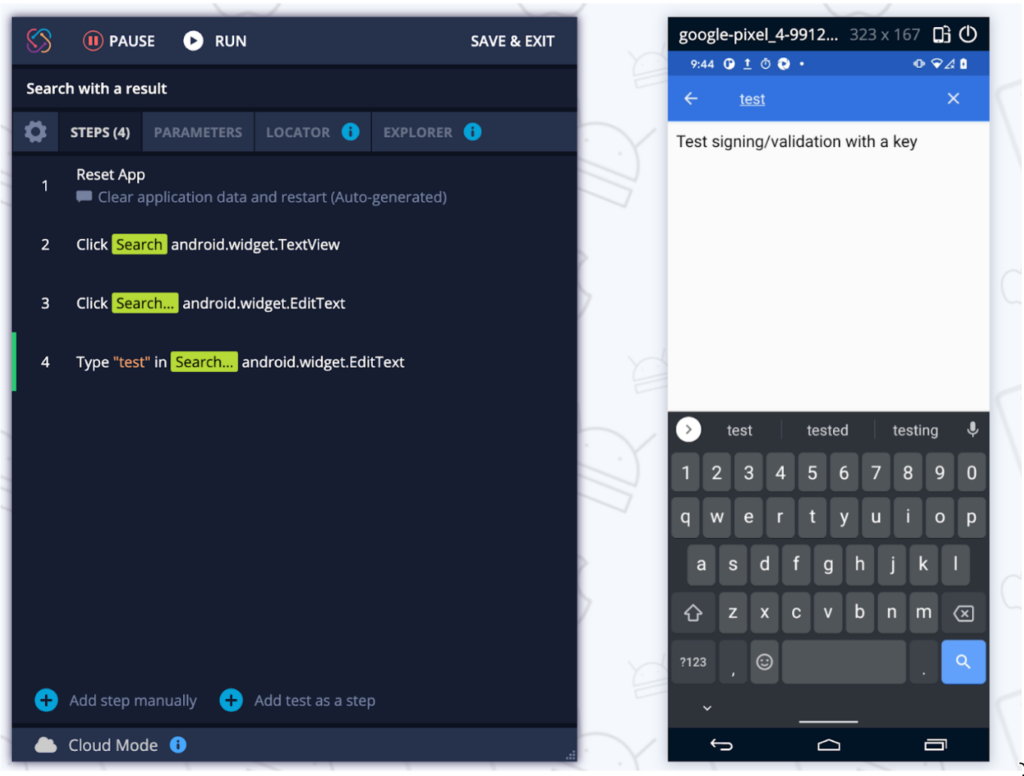
- Verify that the screen has no results or is empty. Hover the search result area -> Press shift twice -> select Validation -> Contain Text?. In this step, if the search result is “Test signing/validation with a key” then it will be Passed.
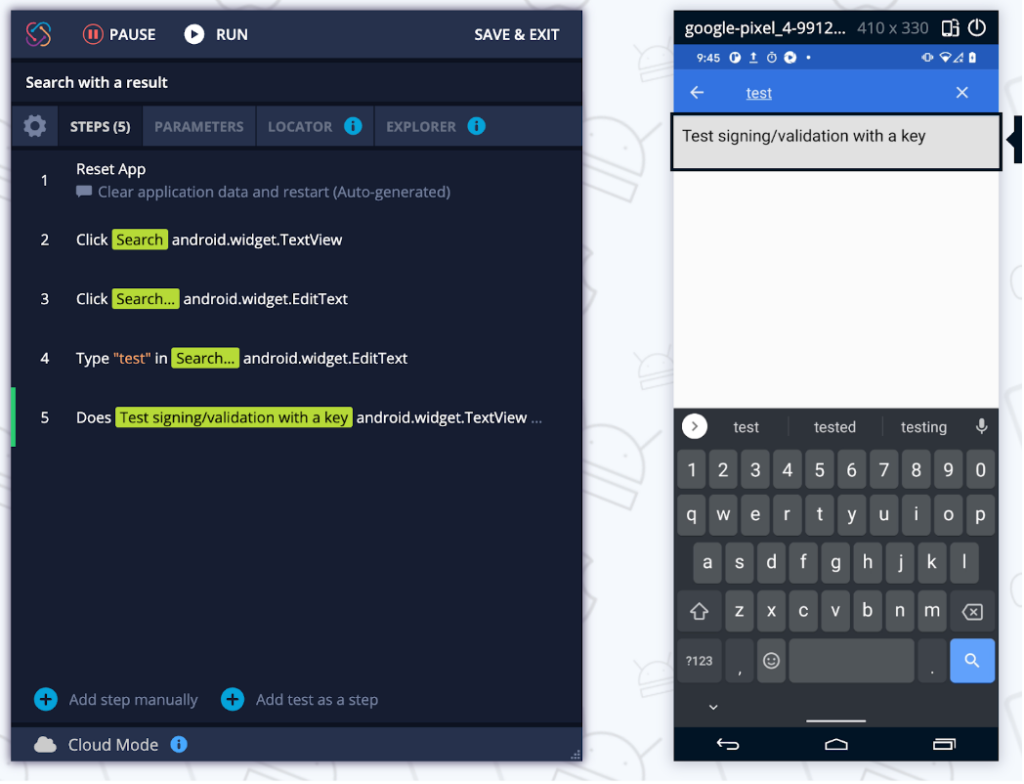
After that, click the Save & Exit button on the left screen, and congratulations our second Test has been created and will be shown on our dashboard!
Create Job
In TestProject, a Job is a collection of test cases. We can group our test cases into logical grouping using Job. I will put the two test cases from the previous step into one Job called “Search” because we are going to test the Search functionality of the application. To create a Job, please follow these steps:
- Click Add a job button

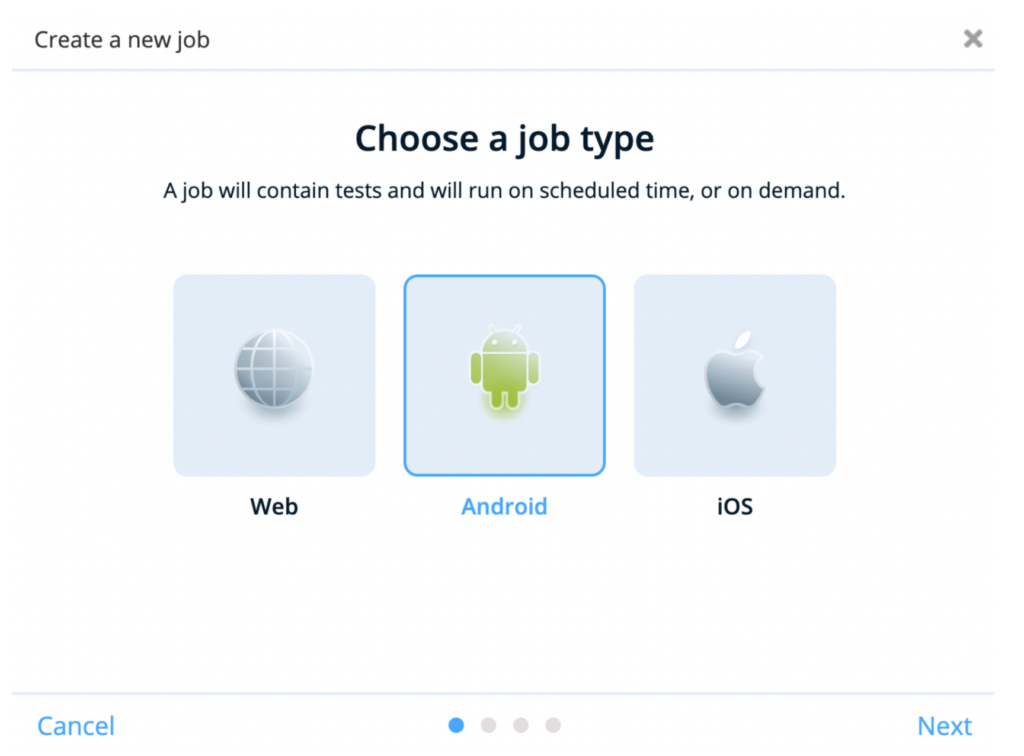
- Choose a job type. In this example, we will choose Android because we are using an apk file and want to test on an Android device (Google Pixel 4).
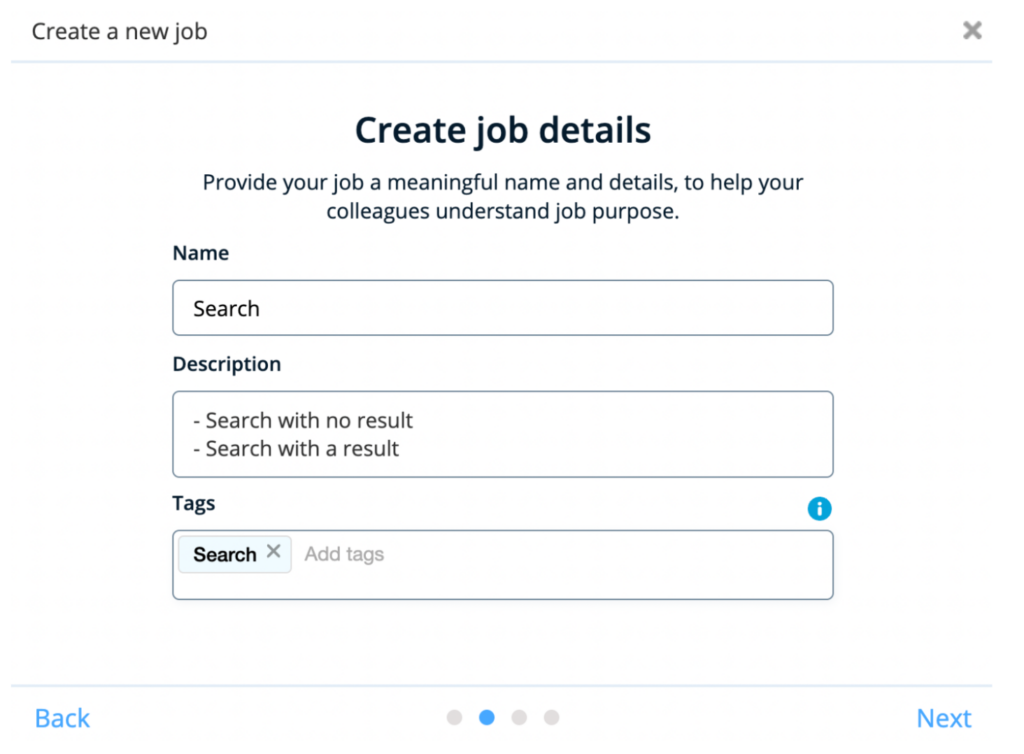
- Enter the Name, Description, and Tags (if needed) of the Job and click the Next button. In the Description, I usually put what Tests are inside this Job. In that way, next time when I revisit this project I know what Tests are inside this Job without opening it.
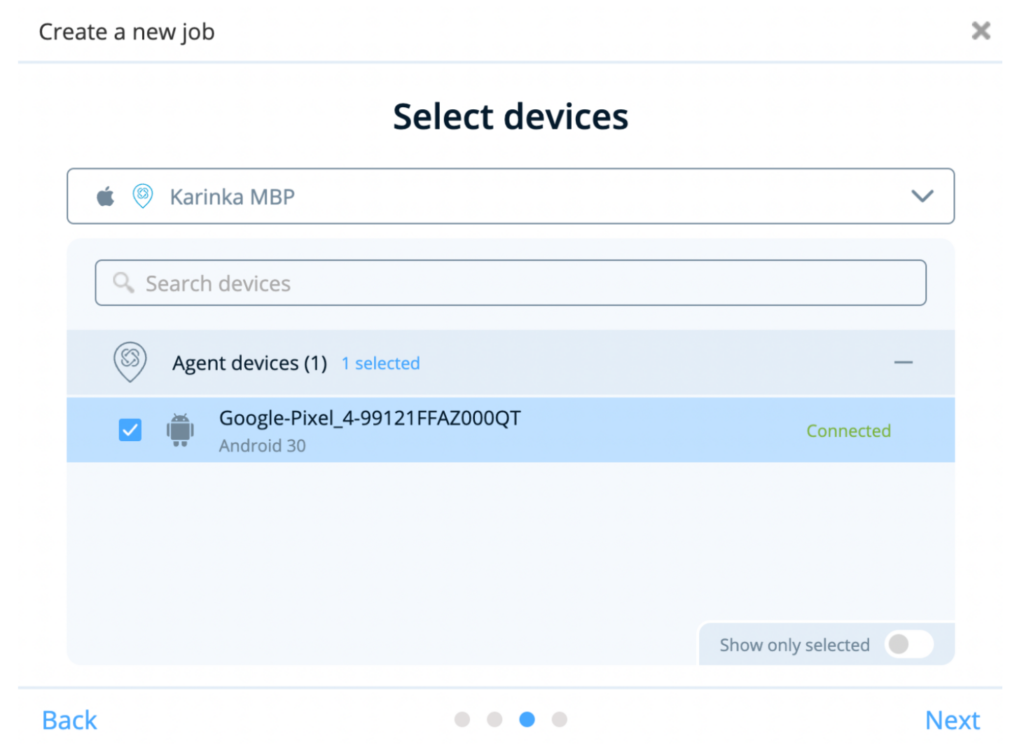
- Select the device to execute this Job. In this example, I will select Google Pixel 4 and click the Next button.
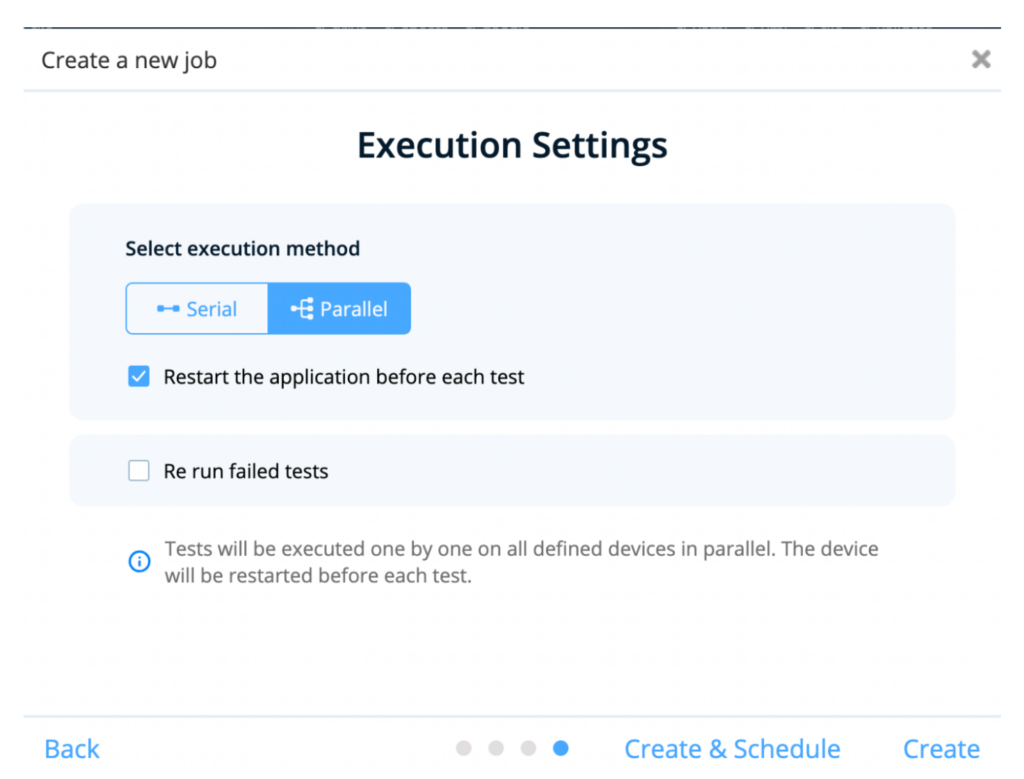
- Do the execution settings. In this step, we can choose whether we want to execute the Tests in Serial or Parallel. If we choose Serial, Tests will be executed one by one on each defined device. If we choose Parallel, Tests will be executed one by one on all defined devices in parallel. In this example, because we only have one device, I will select the Serial and select Reset the application before each test. After that, click the Create button.
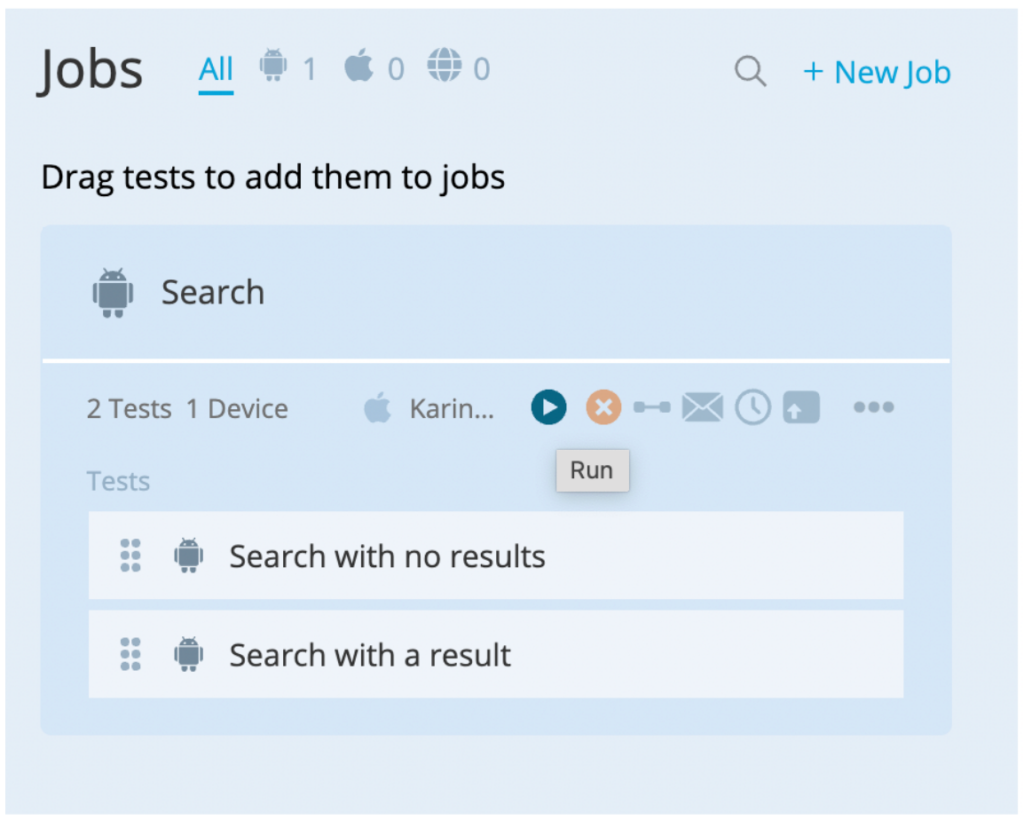
Congratulations, a Job has been created! Next step, we only need to drag the two Tests into the Job.

Run and Monitor the Job
In this step, we will run the Job. Once the Job is running, TestProject will execute each Test inside the Job. We can also monitor this process to see the real execution of each Test on the application.
- Now is the time to Run the Jobs and see the result. It is okay to have a failed test for the first time. We still can modify the Tests later. To run the Job, simply click on this Run button.
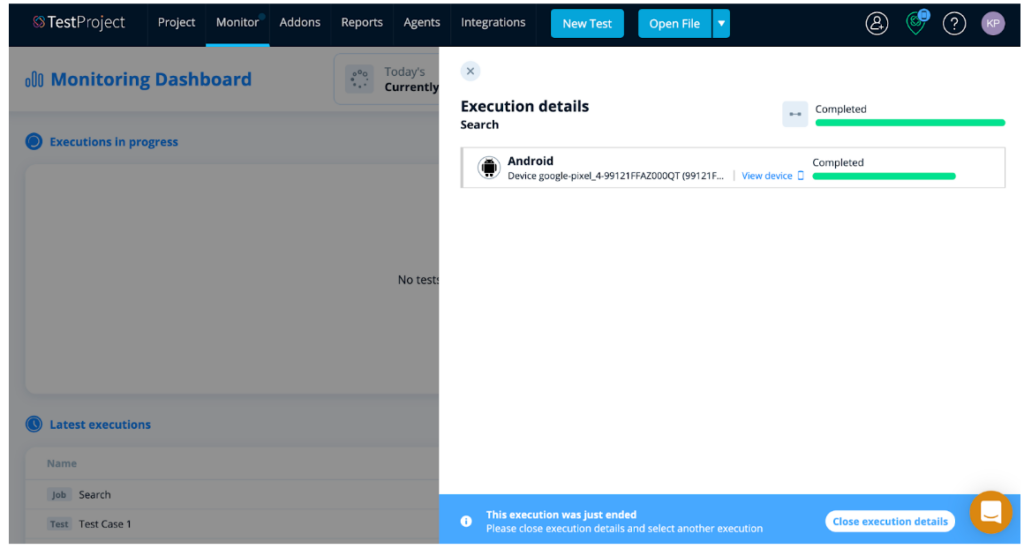
- When the Job is running, we can monitor it from the Monitor menu and check the progress of our test execution.
View Report
Once the Job has completed running, a report will be generated. By viewing the report we will be able to check each Test’s status (failed/passed) and what is causing the failure. We can check the report from the Reports menu. Select the Project -> Job that has just been executed and view the Job Report.
If we click on the Failed Test (the red one), we can see which step made this Test fail. Based on the report, Step 1 (Reset App) is causing the error.
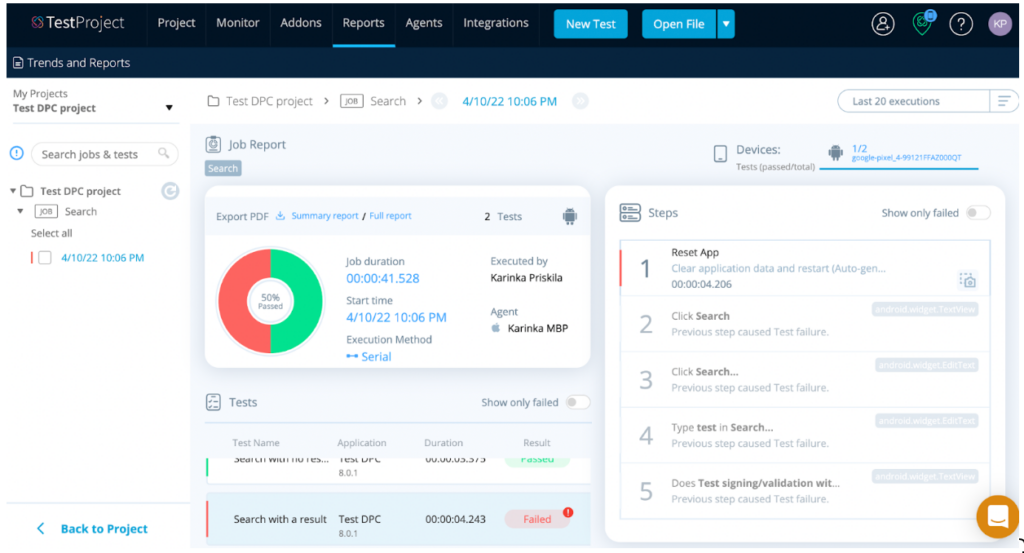
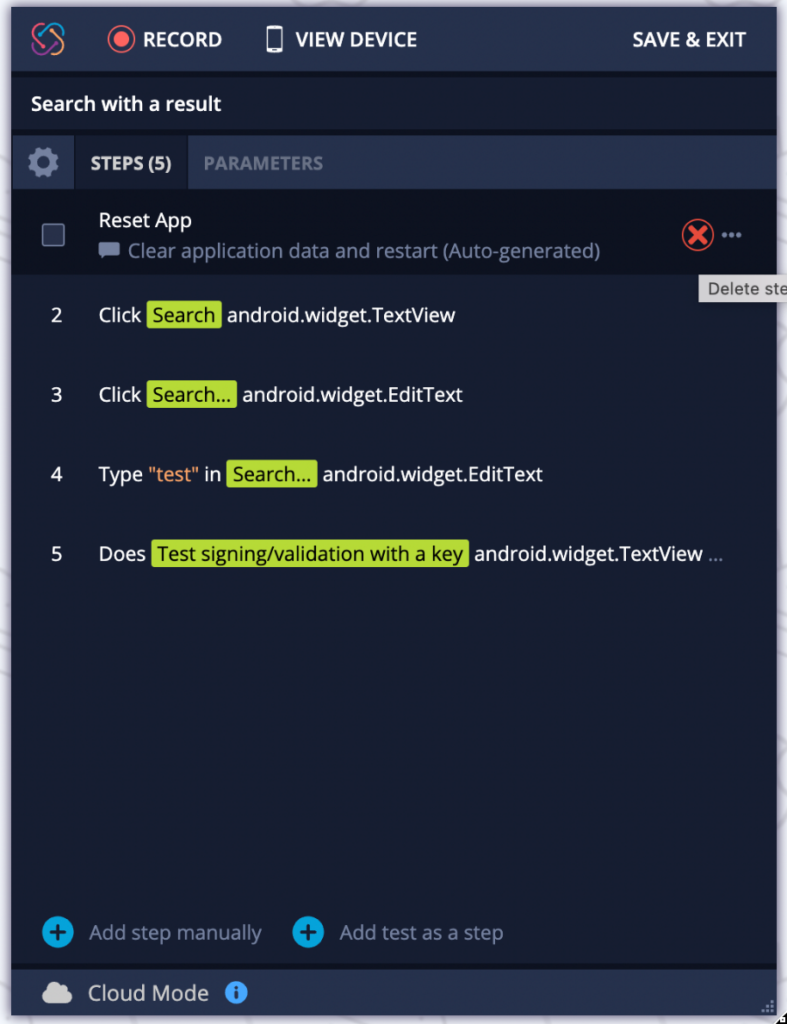
So, let’s fix this Test by removing Step 1. Click on the Project menu in the main navigation. Open the Test “Search with a result” and delete Step 1 by clicking on the X button. After that, click the Save & Exit button to close the recorder screen and back to the Project screen.
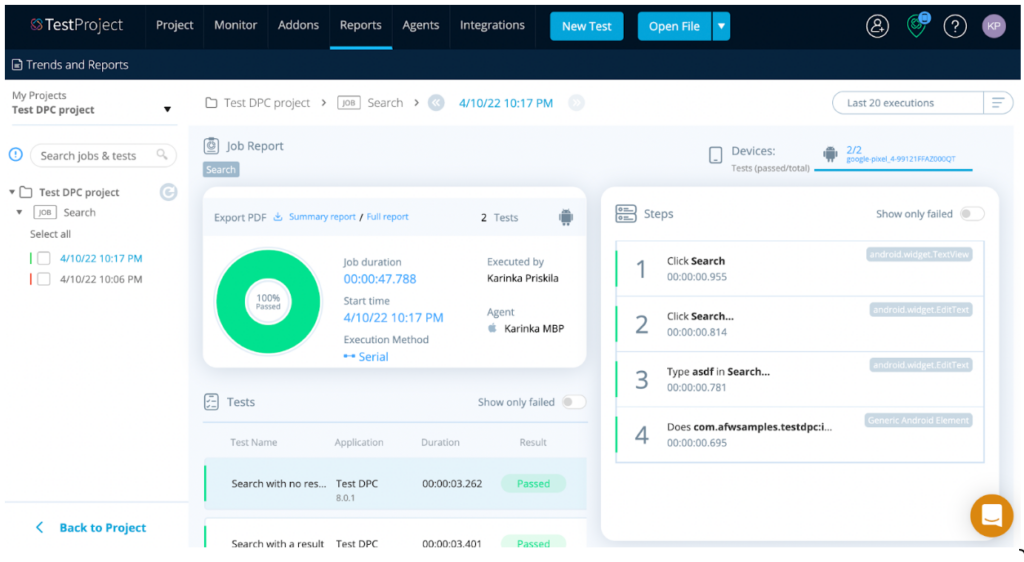
Re-run the Job and after it is completed, go to the Reports menu again and check the latest Job Report. As we can see, now all of the Tests are Passed.
Congratulations, you have completed all steps to create the automation testing (create Test, create Job, execute Job, view Report) with TestProject! They are good and ready to use whenever we need to test automatically the Search functionality of the application.
Key Takeaways
- As Manual Testers with no programming skills, it is still possible for us to start learning and jump to Automation testing by exploring scriptless automation frameworks.
- One of the scriptless automation frameworks, TestProject provides cloud platform to create, run the tests and review the tests result all in one place.
References
Written by
Karinka Priskila
More Articles

Kriangga Wicaksana
August 10, 2022
9 Mins Read